- Nov 9, 2025
🎬 Veo 3.1: Combine Elements + Auto-Speech + Timeline in 8s 🎬
- Francesca Fini
- MICRO-TUTORIALS
- 0 comments
AI video is finally getting practical. With Veo 3.1 you can bring consistent characters and locations from reference images (“Elements” / “Ingredients”), add native speech and sound directly from your prompt, and assemble a multi-shot sequence on a compact timeline—all inside popular launchpads like OpenArt or Higgsfield. The result: crisp, controllable 8-second clips that feel storyboarded rather than random.
Why this matters now
Elements/Ingredients let you steer look and identity with 1–3 reference images for characters and setting. This is the bridge between concept art and moving footage.
Auto-speech (native audio) means you can embed dialogue lines in the prompt and get synced speech and ambience out—the clip is no longer silent.
Timeline editing & multi-shot tools give you scene-level control: timestamps, cuts, and variations within a single generation cycle.
The 8-Second Method: Elements + Auto-Speech + Timeline
We’ll use either OpenArt (Veo Elements) or Higgsfield (Veo Ingredients) as the front-end to Veo 3.1. The workflow and prompt structure are identical; only the UI labels differ slightly.
Step 1 — Prepare your “Elements” (reference images)
Gather 2–4 visuals:
Character A (primary) — full or ¾ body, neutral lighting
Character B (secondary) — similar angle/lighting if possible
Location / set — a clean master of the environment you want
(Optional) Prop/style card — palette, costume detail, or logo
Upload these to:
OpenArt → Video → Elements to Video → Veo 3 / Veo 3.1 (look for “Elements to Video” in the Veo section)
Higgsfield → Create → Video (Veo 3.1) → Ingredients. NOTE: Activating the Multi-shot mode.
Tip: Choose images that already communicate composition and mood. Veo 3.1 adheres better to structure + style when the references are clear and consistent.
Step 2 — Plan a mini-storyboard (8 seconds max)
Think in shots, not frames. For 8 seconds, plan 2–3 shots:
Shot 1 (0–3s or 0–4s): Establishing wide—place the characters in the space of your location reference.
Shot 2 (3–6s or 4–6s): Mid/over-shoulder to advance action/emotion.
Shot 3 (6–8s): Close-up or insert that lands the beat.
You’ll encode this plan directly into the prompt with timestamps.
Step 3 — Write the multi-shot prompt with timestamps + dialogue
Veo 3.1 understands clear timestamp brackets, camera language, actions, and quoted dialogue for auto-speech. Keep lines short and “speakable.”
Prompt template (copy/paste and customize):
[00:00 - 00:03] Establishing wide shot: {scene summary using your location reference}. {Character A} and {Character B} are positioned as in the reference. Natural restaurant ambience. {Character A} smiles and says, "..."
[00:03 - 00:06] Medium two-shot or over-shoulder: {brief action}. {Character B} replies, with a subtle robotic/soft voice, "..."
[00:06 - 00:08] Close-up: {who’s in frame}. {micro-action or reaction}. {Optional final line} "..."
Style: cinematic, realistic lighting, true-to-reference wardrobe and faces. Keep character identities consistent with the uploaded images.
Audio: generate natural speech that matches each quoted line; maintain room tone and subtle foley.
Aspect: 16:9 (1080p), Duration: 8 seconds, 24 fps.
A Concrete Example (customize to your story)
A woman biker and her loyal vintage robot are having a chat in a diner.
Below are the reference images and a full prompt following the above format (timestamp → shot type → description → dialogue). It assumes three references: woman, humanoid robot, restaurant interior.
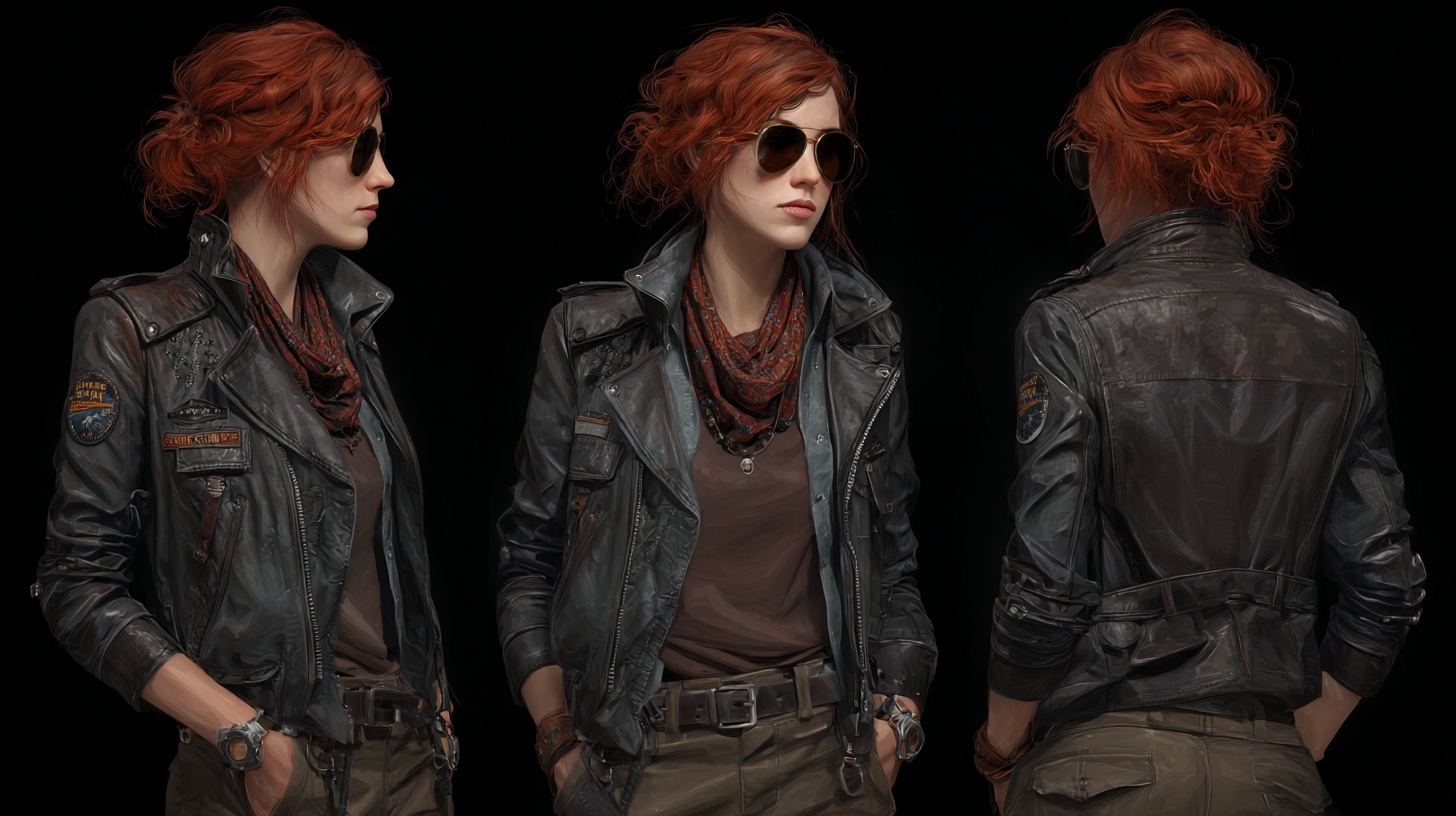
Reference Character Sheet for the Woman
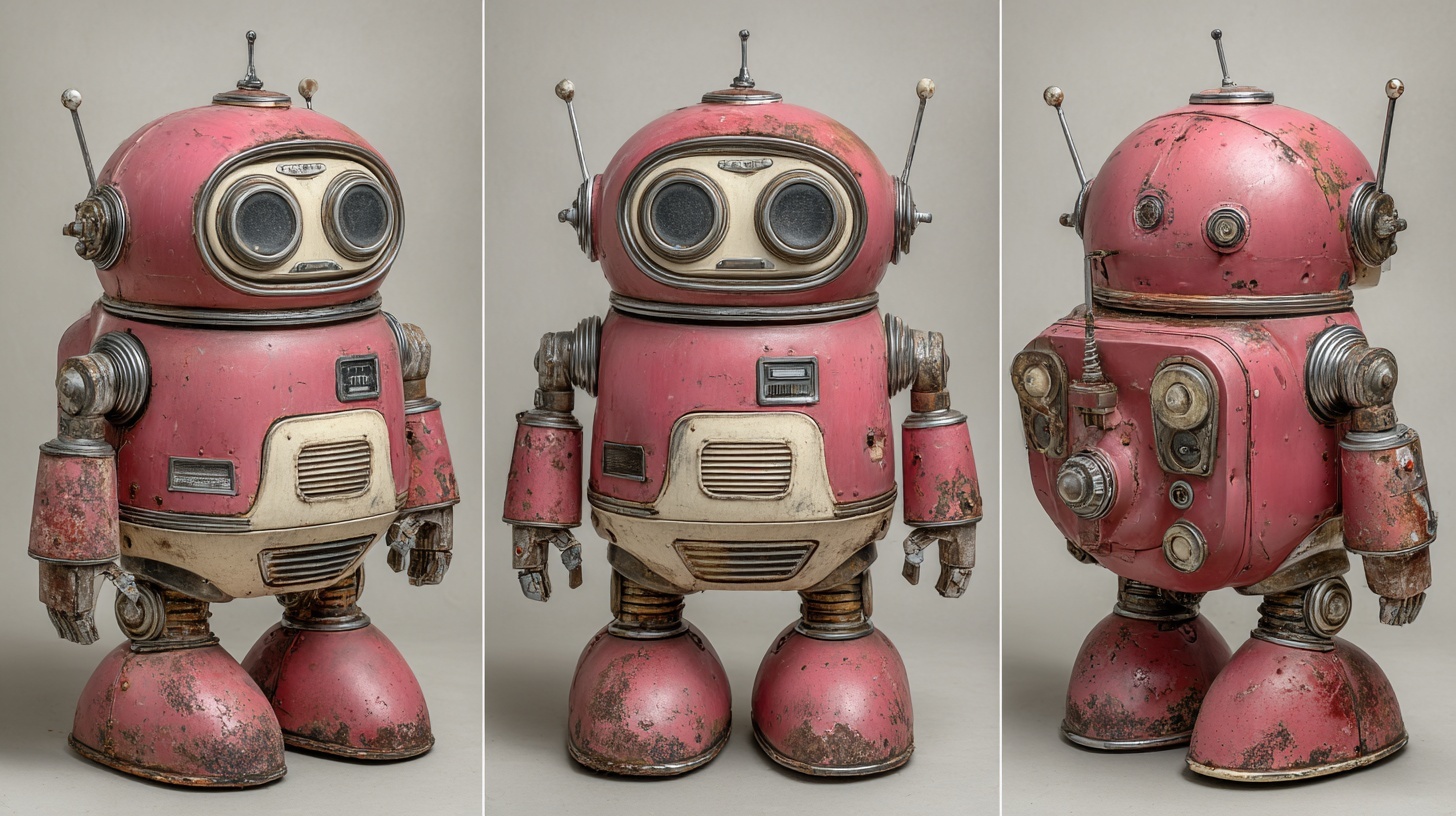
Reference Character Sheet for the Robot

Reference Image for the Setting
Prompt
[00:00 - 00:03] Establishing wide shot: a woman and a humanoid robot, same height, sit at a restaurant table facing each other. The woman smiles and says, "You're surprisingly charming." The robot’s eyes blink, servos hum softly.
[00:03 - 00:06] Medium over-shoulder from the woman toward the robot: the robot tilts its head, subtle LED flicker. With a gentle, synthetic voice, it replies, "Learning from the best."
[00:06 - 00:08] Close-up on the woman: she raises an eyebrow, amused, and whispers, "Prove it."
Why it works: The establishing shot locks spatial relationships to your location reference; the mid shot carries the exchange; the final close-up lands the beat. The quoted lines trigger auto-speech, while “room tone” fills space between lines.
Troubleshooting & Pro Tips
1) Faces drift from references.
Make references clean, frontal, and similar lighting. If consistency slips, reduce style adjectives that fight the reference or add “keep character identity true to the uploaded images.”
2) Dialogue clarity / mix issues.
In the prompt: “Audio: prioritize clear speech over ambience.” If the voice feels off, specify descriptors (“calm alto, natural American accent”).
3) Timing is tight at 8 seconds.
Let Shot 1 breathe (3–4s), keep Shot 2 brisk (2–3s), reserve ~1s for a reaction CU. That pacing reads well on social and trailers.
4) One shot is great, the rest not.
Use your tool’s timeline to regenerate the weak shot only; don’t throw away the entire sequence.
5) Export & aspect.
For YouTube/desktop, 16:9 (1080p). For Stories/Reels/TikTok, choose 9:16. Verify your front-end’s resolution options before generating.
Quick Start Checklist (copy/paste)
Upload 2–3 Elements for characters + location
Write timestamps and shot types (establishing → mid/OS → close-up)
Put dialogue in quotes; add voice descriptors + room tone
Set 8 s, 24 fps, desired aspect; Audio ON
Generate → trim/move shots on the timeline → retry weak shots
Export and share